

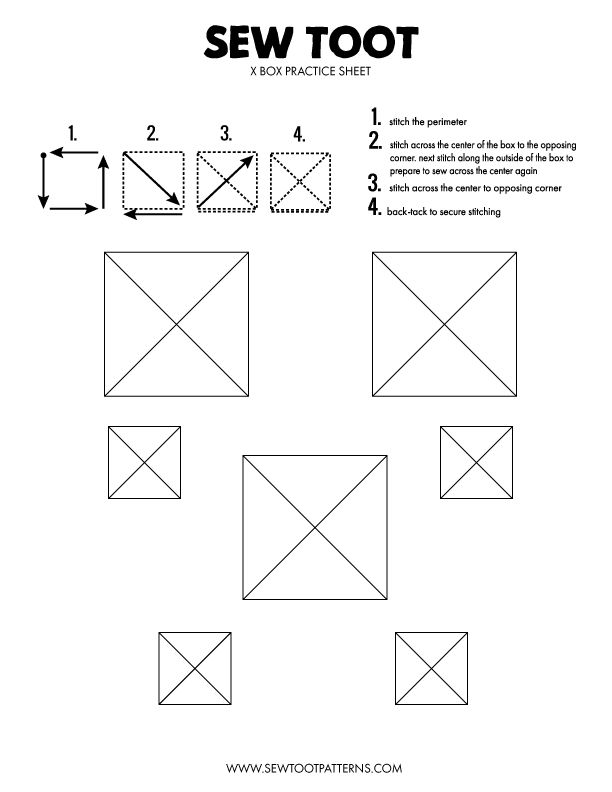
This free practice sheet helps you learn the X-box stitch, one of the most important stitches in a constructing a baby carrier-before you sew an actual carrier.
[Download is at the bottom of this post!]
Most of us feel a little nervous the first time we sew through carrier straps, and that’s completely normal. A few minutes of practice on paper makes the real thing feel much more familiar, whether this is your first carrier or it’s just been a while since your last one.
What is an X-box stitch?
An X-box stitch is a strong structural stitch made for reinforcement. It’s composed of a rectanglular box of stitching with two diagonal lines sewn corner to corner inside it. On a baby carrier, these are at points where we are attaching straps and webbing to the body of the carrier.
The box spreads the pull across a wider area of fabric, and the X adds more lines of stitching through the middle, so the load is shared by many stitches instead of resting on one single row of stitching.
Why practice?
Sewing through paper with no thread in the needle is perfect because it leaves a line of tiny holes, so you can see exactly where every stitch went. You get to practice the tricky parts (sewing a straight line, stopping right on a corner, and pivoting cleanly) without using any thread or carrier fabric.
It’s also low pressure. If a line wanders, you can just print another sheet and try again.
How to use the practice sheet
- Print the sheet. Regular printer paper works well. Print a few copies so you can practice more than once.
- Take the thread out of your needle. Set your machine to the stitch length your pattern calls for, and if the paper starts tearing along the line, lengthen the stitch a little for practice.
- Line up at the starting point. Lower your needle into the paper right on the line, then lower your presser foot.
- Sew slowly along the line. Keep your eyes on the line just ahead of the needle and let the machine feed the paper. Guide it gently without pushing or pulling.
- Pivot at each corner. Stop with the needle down in the paper exactly on the corner. Lift the presser foot, turn the paper to line up with the next line, lower the foot, and keep sewing. Turning the hand wheel for the last stitch or two helps you land right on the corner.
- Follow the path all the way through. A common way to sew an X-box in one continuous line is to sew all four sides, sew one diagonal, stitch along one side a second time to reach the next corner, then sew the second diagonal.
- Check your work. Hold the sheet up to a window or a light. You’ll see right away whether your holes stayed on the line and whether your corners landed where they should.
If your first few boxes look wonky, that’s okay! Keep practicing and they’ll get better quickly.
Before you sew your carrier
Sewing through paper dulls a needle, so put in a fresh one before you start on your carrier. Some sewists keep an older needle just for paper practice and swap it out afterward.
Then sew one test X-box on scraps of your actual carrier fabric and webbing, using your real thread. This lets you check your thread tension and see how your machine handles the thickness before you stitch on a real carrier.
[Download the X-Box Stitch Practice Sheet (PDF) – Click Here]
The sheet is free, and you’re welcome to print as many copies as you need. When you’re ready to sew the real thing, [browse the baby carrier patterns] and pick your next project.
Let’s Sew!



0 Comments